Archive for the ‘Geekery’ Category.

Donated to Tomato Router Firmware

Tomato is a small, lean and simple replacement firmware for the Linksys WRT54G.

The Tomato Router Firmware works beautifully. With the TCP Vegas and QoS settings, I can have several users on my network including torrents and web surfers and still have the best Skype call quality I’ve ever had, all with the same DSL connection I’ve had for years. The interface is fabulously clean and functional. I can see who is on the network and get a good feel for what is happening at a glance. I’ve been running the software for almost a year now and, plain and simple, it works great.

I just donated $20 to the project.

I am currently running Tomato version 1.25 on a Linksys / Cisco WRT54GL. (yes, v 1.27 is currently available)

Looking for iPhone Offline Website Caching

I’m using wikis more and more for business. I have a lot of content that I need access to on a daily basis. I need to be assured of having access to this data wherever I go. Some examples include the  phone numbers and addresses for my tutoring clients, shopping lists for my classes, todo items for my business.

What I want is an application to crawl each of my several private  mediawiki sites and make them available offline on my iPhone.

Some products that almost fit the bill include:

  • Instapaper – can’t grab password protected pages
  • Several Wikipedia caching programs – really close! If they could grab my password protected Mediawiki sites, I’d be set
  • Evernote – I haven’t tried it yet but I don’t think this is what I want
  • I can make html archives of my Mediawiki sites. I can view this on my laptop which is good. I would like to view them on my iPhone.
  • Apps that make Data URLs like Filemark Maker are nice but it’s a multi-step process involving my home computer
  • Web pages saved on the PC then viewed with Dropbox. Again it’s multi-step process each time I want a new archive. Maybe I/you could crawl my site with wget and throw that into Dropbox. The HTML archive won’t be pretty and I’d have to manually “Favorite” a lot of pages.

Do you know of an application that can do this? Or maybe you’ll like to write it, becoming  rich and famous?

Secure Your Public Wifi Usage

Q: When you are in your local coffee shop sipping on a latte, surfing the web, what prevents your neighbor three rows over from stealing the internet passwords you type in?

A: Nothing!

If you go to web sites that start out “https://”, (the “s” is the important part), you’re safe. But if you log in to non-secure sites, which happens all the time, your neighbors can “sniff” the network and see exactly what you are doing. To protect yourself, you need to use some kind of security. To get all geeky on you, I’m going to describe using a proxy through SSH tunneling, or possibly described as making a VPN to the cloud.

I took this content from Shanghai Web Hosting. He’s got some good geekery content there. Check it out. I’ve tried it myself and it took just a few minutes to get it going. If you are baffled by this but are worried, and you’re a friend of mine, then call me!

I used my web host provider, Dreamhost as the tunnel server. If you don’t have a web hosting provider (IE a company that hosts a web site like Dreamhost hosts Lee.org for me), then… umm.. that’s another issue.

In brief, here’s what happens when you use this system

  1. You set your web browser once to use the new secure tunnel.
  2. You connect to the trusted server with SSH. A secure tunnel is automatically created.
  3. The bad guy 3 rows over sipping a latte and sniffing the cafe’s internet connection doesn’t see your passwords.

————————————————–

As SSH is inherently tunnel-enabled for setting up socks5 proxy servers, you can instantly turn your personal computer into a socks5 proxy server by the help of PuTTY through your web hosting server, breaking through firewalls. The idea is to direct all traffic from your local computer browser through PuTTY SSH session to the web hosting server and back from it.

Here we go:

  1. First, make sure your web hosting provider provides SSH access to your hosting server.  DreamHost (use coupon  CASH60 for $60 discount) as well as a lot of other hosting companies do.
  2. Second, download  PuTTY, run it, and set up the SSH account by entering your hosting server address in  Host Name (or IP address).
  3. Add SSH tunnels by:
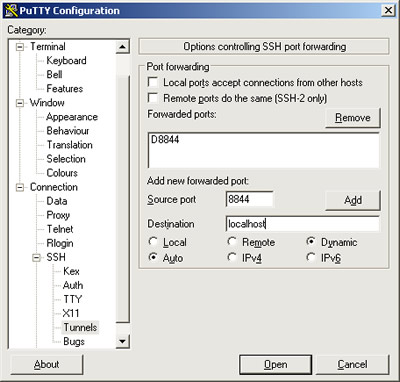
    Connection -> SSH -> Tunnels ->   give it a random  Source port (in this example, ‘8844′), enter  Desctination as ‘localhost’ and select  Dynamic and  Auto, and clickAdd. Now there should be an item of ‘D8844′ in the  Forwarded ports list.putty-tunnels-proxy
  4. You may want to switch back to  Session to save the session for easy access so that a simple double click would trigger the connection based on all the configurations you have done so far.
  5. Double click the saved session and log into your SSH account. Now you are in your web hosting server.

Leave the SSH session open and your personal computer has now become a socks5 proxy server. Open your favorite browser, for example, FF3:

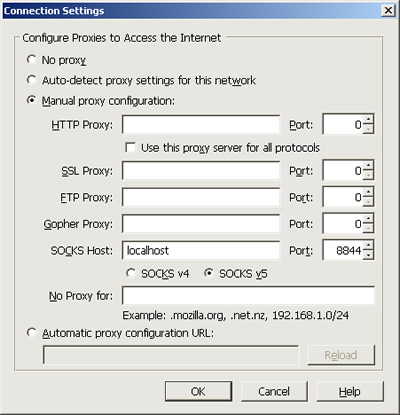
  1. Tools -> Options -> Advanced -> Network -> Settings -> Manual proxy configuration -> SOCKS Host: localhost, Port: 8844 -> OKfirefox-browser-proxy-settings
  2. You are now set. Fire up a tab and surf through the socks5 proxy on your local computer.

Remember though, that all traffic you use by browsing the web pages and downloading whatever stuff by the local proxy goes through your web hosting server and will be counted on the hosting bills.

Exciting! Now you’ve got your very own proxy server (socks5 server is the most versatile among all types of proxy servers including HTTP proxy and FTP proxy) that’s local, stable and in your perfect control for getting around all kinds of firewalls. Screw all those obsolete online proxy server lists with unusable proxy servers!

I haven’t used it yet but a program like FoxyProxy or Proxifier can help make it easier to enable this kind of system. Those two applications were recommended to me by security-conscious  friends.

—————————————–

Once you’ve got that setup, you can put a shortcut on your desktop of wherever that lets you start it quickly. Make the Target of the shortcut look something like this and it’ll start your new Saved Session but quick.

C:\Users\Lee\Programs\putty.exe -load “enable proxy tunnel”

And if the Saved Session has a hostname that looks something like this, you won’t have to type in the username, only the password

User@lee.org

—————————————

Ok, now you’re ready to run VNC through an SSH proxy tunnel. I found instructions on DSLReportts.com that work. This worked for me in about 10 minutes :-)

Using VNC through a Putty SSH tunnel

Run putty and setup an SSH connection and tunnel to the VNC server.

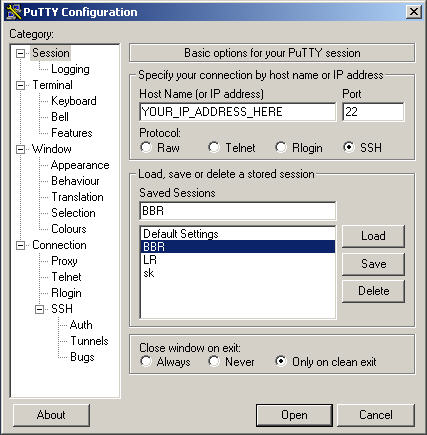
In this example we have setup an ssh connection to YOUR_IP_ADDRESS_HERE and given
it the session name  BBR .
vnc1

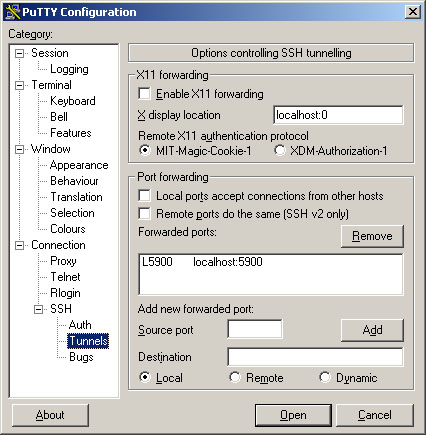
Finally set up a tunnel from port 5900 to your computer to port 5900 on
the VNC server. (as shown below)
vnc3

Now  you must save the session otherwise you’ll need to do it all again
next time you make a connection.

Open the session and make a connection to the SSH server.

Step 4.:
Run the Ultra VNC viewer and make a connection to localhost:5900.
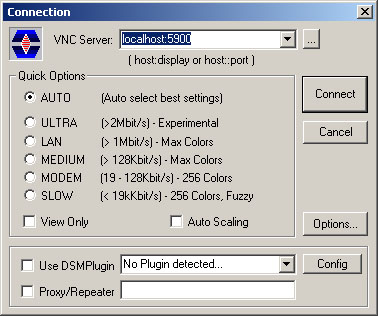
vnc5

You should have a login prompt from the VNC server machine now.

How to Control Someone’s Computer Remotely

I regularly take control of the computers of friends and relatives to help them resolve computer problems. It’s just so much easier SEEING the problem than having it described to you.

Easiest method: Team Viewer noncommercial version

Your friend must be at their computer to help log you in. Team Viewer relies on VNC and VNC Single-click code. The Team Viewer people are running a Repeater and a pretty interface.

Tell your friend:

  1. go to http://www.teamviewer.com
  2. click on “Start Customer Module”
  3. download and run it
  4. When it says “please tell your partner the following ID to connect to you desktop” tell them the numbers shown

What you have to do:

  1. go to http://www.teamviewer.com
  2. click on “Start full version”
  3. download and run it (you don’t have to install it… follow the prompts)
  4. Where it says “Create Session”, type in the ID that your friend tells you
  5. then type in the password your friend tells you
  6. Now, you HAVE THE POWER! You can control their PC :-)

Let’s trade backup space

This is going out mostly to friends of mine…

Would you like to be my Crashplan.com backup buddy? I’ve been playing with it a bit now and I feel pretty good about it. We trade disk space on each others computers… we can’t see each other’s data, but it’s backed up nicely. And it doesn’t cost money to run it peer-to-peer like this. It can be set up so that the Crashplan people don’t have any backdoors into your backup.

I’m looking for maybe 100 gig and I can offer you the same.

Preference will go to friends that don’t live very close to me since one concern is the whole San Francisco earthquake –> fire –> destruction thing.

iPhone sync on PC fails: Solution!

I went away for Thanksgiving. When I came back, my iPhone wouldn’t complete a sync with iTunes. This is what would happen:

  1. plug USB cable from iPhone to PC
  2. sync starts
  3. iTunes says “backing up iPhone… syncing iPhone”
  4. and then iTunes would stop. The iPhone disappeared from the Device List on iTunes. The phone kept saying “Sync in Progress”… forever :-(

And one time when I tried syncing, I got a message on my computer:

Attempting to copy to the disk “iphone” failed. The disk could not be read from or written to.

Here is how I fixed it:

I went into iTunes on my PC and deleted the video podcasts I had recently watched and subsequently deleted on my iPhone. It was several items from the “Best of Youtube” video podcast. I then synced the iPhone again, this time successfully. Hurray!

I’m not sure if this had anything to do with it but I also did the following:

When I was travelling, I had updated several iPhone apps directly on my iPhone. I went and updated the apps on iTunes and then synced. I’m pretty sure the fix I mentioned in the previous paragraph was what did it, but if not, try updating the iPhone apps on your computer.

Feel free to comment and tell me if this works for you!

Maker Faire 2009

I shoved together all the video footage I took at Maker Faire 2009 and… well, here you go. Enjoy!

local version:

Free Wikis

My friend Karen asked me about free wiki software. Here is my response

————————–

Well, PBWiki (http://pbworks.com/) offers advertiser supported wiki services but I really really really (really!) recommend using Mediawiki instead. Mediawiki is the software that runs the FLG wiki. It’s really good software and it’s what users are familiar with. I run it on Dreamhost.com. If your friend has an ounce of geek in them, they should sign up and run their own wiki. And if they don’t have an ounce, they probably shouldn’t be running a wiki, really.

Dreamhost service is like $8/month. I have a coupon-thing where they’ll get $48.50 off a $96 1 year membership or $25 off a monthly. My promocode: SPLITITWITHLEE

Oh and I see that they have a free trial thing on their homepage: http://dreamhost.com/

If your friend can find a friend that already has a hosting plan at Dreamhost or another provider, they might let them mooch off them for free since it probably won’t cost any money extra. That’s what I do for SWARM and FLG and some personal wikis I run.

Installed Tomato Firmware, Loving it

I installed the Tomato firmware on my WRT54GL about 15 minutes ago. I was clenching my teeth, preparing for a long slog through the trenches of firmwaredom but I got a very pleasant  surprise!

Installation was:

  1. download
  2. install firmware
  3. set the SSID and password

I was up in 5 minutes! W00t!

Now I’m wandering through the configuration and it all “just works”. I am very happy. I think I might have to make a donation to the project.

The main reason I needed to upgrade was that the Linksys firmware has this asinine problem: you can open specific ports in the firewall for services like FTP and VNC but you can’t set static DHCP IP addresses with the server, you’ve got to muck with the client computer’s settings. That is dumb. All the open source firmware does it, DD-WRT, Open-WRT etc… but Tomato promised to do it EASILY. And it succeeded.

5 stars for Tomato!

WRT54GL doesn’t support static IP address client via DHCP

That is stupid.

PARTICULARLY since the firmware has a whole section for “Port Range Forward”ing. DOUBLY SO since the firmware upgrade I ran today, bringing it from a 2007 version to a 2009 version, improved on this by adding a “Single Port Forward” feature. The ASININE trouble is that you have to specify what IP address you are forwarding to BUT you can’t associate an IP address to a MAC address on the router. DUMB.

Yes, you can set the IP address manually on your computer but SCREW THAT SHIT.

DD-WRT, Tomato or Open-WRT will be installed shortly.

Update 11-21-09: Tomato installed. Loving it.